Repligator Tutorial 2: More images
(You may like to print this tutorial (see under the File menu of this window), it is about 2 A4 pages long)
We will repeat the first two steps of the previous tutorial.
Step 1) Open an image by clicking on ![]() in the toolbar. You can choose one of the images supplied with Repligator for
this tutorial, for example Swan.jpg.
in the toolbar. You can choose one of the images supplied with Repligator for
this tutorial, for example Swan.jpg.
Step 2) You will be asked to choose an effect or to let the wizard choose:
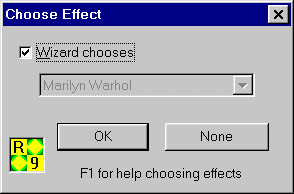
Step 3) Leave the "Wizard chooses" check box checked and click on OK. Repligator will automatically choose an effect and its settings for you. Here is an example of what it might create:

Step 4) Now the fun part! Click on ![]() or the F12 key. Note that this icon has 2 lightening bolts. You
will get a dialog:
or the F12 key. Note that this icon has 2 lightening bolts. You
will get a dialog:
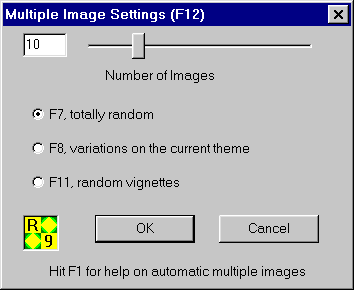
Here you can set how many images you want to generate automatically, and what sort of generation you want to do. Set your dialog box to look like the above, and click on OK.
Step 5) Repligator will now generate 10 images in your sequence.
You can interrupt the generation by clicking on the image itself, or hitting
the ESC key, or clicking on the ![]() icon.
icon.
Step 6) Now you can use the ![]() buttons to review and or save some of the images which have been created.
buttons to review and or save some of the images which have been created.
The next tutorial will use the images you have created in this tutorial, so don't exit Repligator if you want to do Tutorial 3 now!